


How to make your podcast more accessible using transcripts
Last updated on June 1st, 2020
When you bring up the topic of transcripts for podcasts, many people are confused. As podcasts are a strictly audio medium, the idea that deaf people could be into podcasts never occurs to many hearing people at all. But, just as many deaf people enjoy films and television as long as there are subtitles, many people enjoy podcasts as long as there are transcripts.
Additionally, there are people who can hear, but who struggle with understanding spoken dialogue—for example, people who have an auditory processing disorder, or people who speak English as a second language and understand it written better than spoken. By offering transcripts, you not only benefit these groups of people by giving them access to your podcast, you benefit yourself in three ways:
- You widen the potential audience of your show, meaning that there are more people who can do things like pledge to your Patreon, buy your merch, and even download your episodes—many deaf people have some residual hearing (myself included) and enjoy listening to episode audio as they read the transcripts
- You have a record of everything you’ve ever said in your podcast that you can search with ease. Trying to remember exactly what you said about sandwiches in episode 23? Open the transcript, search “sandwich”, and there you go!
- If you have transcripts embedded in your site, you do something amazing for your search engine optimization: people could now find your podcast in search results through searching any combination of words that get said at any point in your podcast
If you have an unscripted podcast, you’ll have to hire a transcriber (also called a transcriptionist) to transcribe your show for you. Rates vary, but usually fall around $1.50-2.50 per minute of audio. If you have a scripted show, though, you’re in luck: you’ve almost got a transcript! Almost. While you could just upload your recording script without changing it at all, I really don’t recommend doing that. Recording scripts are better than no transcripts at all, but they’re missing things like tone description and ad libbed dialogue—the things that really help transcripts give audiences who read them the same experience as audiences who can listen to the show.
So! Let’s go step by step through how to turn your recording script into a transcript.
Step One: Hosting
The first thing you should consider is how you’re going to make transcripts available. Uploading transcripts is the last step, so you could technically wait to decide this until after your first transcript is ready; but I highly recommend deciding now, because this could affect how you format your scripts in the next steps. You have a few options here. The two I’ve seen most commonly:
- Have transcripts available as a PDF, either through a public Google Drive folder you link to or through giving people the option to download the transcript directly from your site
- Pro: Giving people the option to download transcripts means that they’ll still be able to experience your podcast if they go to a place where they won’t have internet access (e.g. if they’re going on a camping trip or a long car ride)
- Cons: Because you generally can’t change the text size of a PDF, these may be difficult or impossible for people with vision impairments to read. Black text on a white background can also be a migraine trigger for some people, meaning that these are inaccessible for them, too
- Put transcripts directly onto your website. This is easiest on a website that allows you to create blog posts, like Tumblr, WordPress, and Squarespace
- Pro: People can much more easily change the text size if they need larger text and use a browser extension to invert the colors if black text on a white background is a migraine trigger
- Con: Because these are on a web page, you can only use these while you have internet access
As you can see, both methods have some benefits and some issues. So, my suggestion is to do both! Have transcripts directly on your website and available to download as a PDF. It doesn’t entirely solve the problem (people with poor eyesight who are going somewhere without internet access may still struggle), but it will make your transcripts far more accessible than just picking one.
If you have transcripts embedded in your website, the transcript for an episode should be available in the same place as the audio. This doesn’t mean you need to have your full transcript pasted directly beneath each episode in a way that makes people have to scroll through the entirety of each transcript before reaching the episode below it (in fact, please don’t do that). It’s better to just give people an easy button or link to click that will take them to the transcript. For example, this is how transcripts are displayed for the podcast Scoring Magic by Hug House Productions, hosted on WordPress:

My one note about this format is that I would recommend having something explicitly telling people “click the link below to view the transcript”—you want to make this as easy and intuitive as possible.
If your website has the option for blog posts but you want your episodes to all be on one page without having separate posts for each episode, you can still take advantage of your site’s blog feature. For each episode, make a new blog post containing the transcript. From there, you can insert a button or link with each episode on your episodes page that links to the blog post containing the correct transcript.
Not all website hosts give you an easy way to have transcripts embedded directly on the site. However, there’s a pretty simple solution to that:
- Create a Tumblr blog for your show (bonus: it’s totally free, and it gives you another platform to promote your show on
- Create an Audio Post and upload the episode audio (either by uploading the file directly or inserting the link your podcast host provides you)
- Put the episode description and any other information you want (content warnings, cast list, etc) in the space below
- Insert a Read more link
- Paste the transcript below that
This is how that looked for my first audio drama, Mina’s Story:
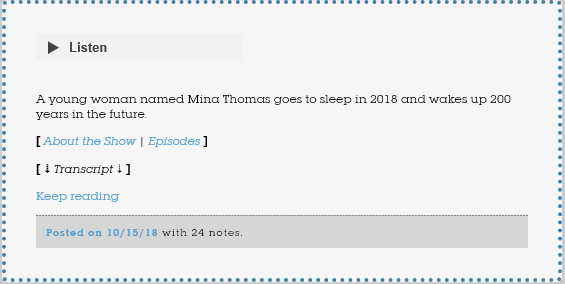
From there, you can just link to that post from your website!
This is by no means an exhaustive list—there are plenty of different ways to show transcripts on your website, and you’ll probably have to experiment a little to find something that works for you. Whatever you do, just keep these things in mind:
- Your transcripts should be easy to find. The unfortunate truth of the matter is that many podcasts—maybe even most podcasts—don’t have transcripts. If somebody can’t tell that you have transcripts within a minute or two of clicking onto your website, it’s very possible that they’ll assume you just don’t have transcripts at all. At best, this means that they have to struggle through listening to your episode. At worst, it means they can’t or won’t try your podcast at all
- Your transcripts should be linked to in the same place as the episode audio. I do not recommend having one page where all of your transcripts are displayed without audio and another page where all of your audio is displayed without transcripts. As a general rule of thumb for transcripts embedded on your site: your audience should only have to have one tab open at a time to be able to view your transcripts. The more tabs they have to have open, the more frustrating it will be, and the more likely they are to just leave your show behind entirely
2) Format
One last step before we get into actually editing the transcript: what do you want your transcripts to look like, and what program are you going to edit them in? If you want to edit the transcript in your script writing software so that transcripts are formatted like your recording scripts, you probably want to open a new copy of the script so that your recording script will remain intact. The Penumbra Podcast has transcripts that are formatted similarly to a recording script, like so:

This works great for PDFs, but may make formatting a little strange if you try to paste it directly onto your website. For easy formatting on your website, I recommend formatting your recording script in a regular word processor, like Google Docs or MS Word.
You’ll also want to think about how you want everything formatted. Do you want character names in bold? Do you want action in italics? If you’re using Word, try doing research into shortcuts you can use to automatically format parts of your transcript (for example, there’s a shortcut to automatically bold every word written in all caps). There’s plenty of different ways to do this, but I recommend making sure there’s an easy visual difference between character names, dialogue, and sound effects/action. For example, the Hug House Productions transcript has speaker names in all caps:

The transcripts for The Far Meridian visually differentiates between all different types of text: scene headings are in bold and buffered by double hyphens, SFX is contained within double brackets, and character names are bold and capitalized.

You can format however you want, just try to make things visually distinct. If you’re unsure what you want to do, I recommend having character names in bold and/or all caps and sound effects in italics.
So! We know where we’re hosting our transcript, we know how we’re formatting, and we’ve got our transcript and the episode audio pulled up. Now for the fun part: editing the transcript itself.
As a quick note: There are several steps to editing listed below. You can either do one listen-through for each step, going through the entire script and making sure one step is completely done before you move onto the next one, or you can just try to do all of the steps at once. Whichever you do—but particularly if you try to do all of the steps at once—I highly recommend doing one final listen-through at the end to make sure that everything is exactly where you want it to be.
3) Editing Dialogue
Some directors are fine with their actors playing with the dialogue—some even encourage it! No matter where the director of this project fell on that spectrum, it’s likely that there are at least a few instances where the written dialogue doesn’t 100% match up with what the actor actually said. Sometimes actors change lines, sometimes they ad lib new ones, and sometimes lines get cut while the audio is being edited. So, one of the first things you’ll want to look for as you listen to the audio and read through the script are any instances where the dialogue in the script doesn’t match the audio. Edit the dialogue that was changed and add in any dialogue the actors came up with.
4) Adding Tone & Volume
Generally speaking, it’s a good idea to use a very light hand when putting tone description (e.g. “happy”, “sad”, “excited”) into a recording script—giving your actors the chance to interpret the lines themselves makes dialogue sounds more natural and can even add new sides to the character that you hadn’t considered. However, this doesn’t hold true in transcripts! Somebody who’s only reading your transcript won’t be able to tell the tone of the people speaking. And, even if they’re listening along, some people with hearing loss struggle to pick up changes in tone. While all of the steps here are important, I personally feel that this step is the most important.
You can notate tone however you want, but make sure that it’s visually distinct from the dialogue itself. Personally, I like to note tone in [italicized brackets]. You can do whatever you want, but make sure that you keep it consistent throughout the entire script (and, ideally, through all of the transcripts for your show).
All this being said, you don’t need to notate every single line—just add in tone when it’s particularly noteworthy or when the tone isn’t immediately obvious from the dialogue. For example, you probably don’t need to do this:
“[Lovingly] I love you, too.”
Since the tone directly matches the dialogue, it’s easy to tell what the tone is just by reading the dialogue itself. However, you would probably want to note this:
“[Sarcastically] I love you, too.”
The “sarcastically” note completely changes the tone of the line, and it’s not as easy to guess just from the dialogue. If you’re not sure whether or not a tone needs to be noted, I recommend erring on the side of noting it.
Noting tone can also be useful in scenes where the emotion of the character is evident in the dialogue, but the emotion slowly builds throughout the scene. For example, in a scene where a character gets progressively angrier and angrier, it may be useful to periodically note their dialogue with things like “[getting angrier]”, “[furious]”, and “[absolutely livid]”.
Finally, you’ll want to make note of any changes in volume that you feel are important. Things like “[Whispering]”, “[Muttered]”, and “[Shouting]”. If people are speaking at a particular volume for several lines of dialogue or more, you can refrain from notating each individual line and instead include a note at the beginning of the dialogue, e.g. “They both drop their voices to whispers.” If you do that, just make sure to note when the dialogue returns to a normal volume.
If there are multiple characters and they all go back to normal volumes at different times, you may want to notate each line. However, if everyone returns to normal volume at once, you can note the change in tone all at once again, e.g. “Everyone returns to a normal volume.”
5) Wordless Vocalizations, Noises, and Pauses
This is something that’s probably more common in the final audio than in the actual recording script: all of the sounds people make without actually saying words. Things like laughter, crying, sighing, “uh-huh”, “mm-hm”, and the iconic “‘I don’t know’ sound”. There are two big decisions you’ll want to make here:
The first is how you want to spell wordless vocalizations. Do you want it to spell “uh-huh” or “uhhuh”? Do you want it to spelled “mmhm”, “mhm”, or “mm-hm”? You can really pick whatever you want here; whatever you pick, though, try to keep it consistent through the entire transcript.
The second is how to actually format these. Things like “uh-huh” and “mmhm” are pretty easy to just write directly into the dialogue. But how do you want to format things like laughter, crying, sighing? What about tearing up and suppressing laughter? Again, this is really up to you. Personally, I format noises that somebody is making simultaneously with dialogue the way I format tone, and I format noises outside of dialogue the way I format action. So, for example, a character laughing while saying a sentence gets formatted like so:
JULIE
[Laughing] You really think that?
While a character laughing, finishing their laughter, and then speaking gets formatted like this:
Julie laughs.
JULIE
You really think that?
You’ll also want to note any particularly significant pauses in dialogue. You don’t need to make a note of every single time there’s more than a second between dialogue, but if you’ve very intentionally created a moment of silence because it adds something to the audio, you’ll want to note that. If it’s a short pause between two sentences spoken by the same character, ellipses might work fine. For longer pauses, I usually note them as an action. For example:
JULIE
I hate you!
A long beat.
JULIE
I—I didn’t mean that, I’m sorry. It just slipped out, I… I’m sorry.
Again: how you format this is up to you, but you want to keep it consistent.
6) Stuttering
In real life, plenty of people stutter during casual dialogue. It happens all the time. Generally, our brains are pretty good at ignoring the stuttering and focusing on what the person is actually saying. In writing, though, stuttering stands out and slows down our brains considerably more. It makes it a lot harder to read the dialogue. For example, this is hard to get through:
“I-I-I didn’t m-mean to, to, d-do it, I-I, uh, um, it, uh, i-it w-was an a-accident, I d-didn’t d-do it on pur-purpose, I-I’m r-really, re-really s-sorry.”
And not only is it hard to get through, it’s ultimately unnecessary. You can get the same effect while vastly enhancing readability if you instead do something like this:
“[Stuttering profusely] I didn’t mean to do it, I—it was an accident, I didn’t do it on purpose. I’m really, really sorry.”
That’s definitely more readable, while still conveying the important thing about the sentence (the character is so nervous that they’re having trouble speaking).
7) Accents
Noting accents is usually unnecessary unless it’s 1) relevant to the plot, and 2) not mentioned in-dialogue for a while. For example, say that your show is set in America, but one of the characters is from Ireland and speaks with an accent. If this is never mentioned and isn’t relevant to the plot at all, you’re probably fine not mentioning it. If this is relevant to the plot but one of the character’s first lines is “I’m from Ireland”, again, you’re probably fine not mentioning it. But if this is relevant to the plot and nobody mentions the character being Irish for a few scenes, it might be worth noting.
Throughout this guide, I’ve stated most formatting suggestions as nothing but that—suggestions based on my own preferences that you can choose to ignore if it doesn’t work for you. However, I’m going to be more firm on this next statement: you probably should not try to transcribe your character’s accent by altering their dialogue in the transcript to match how you hear the actor say it.
Between all of the countries where English is spoken frequently, there are dozens (if not more) of different dialects and variations, based on things like class, region, and culture. Somebody pronouncing a word differently than how you pronounce it isn’t saying the word wrong, they’re saying it correctly in their dialect—and their dialect is not a less correct form of English than yours. When you note an accent (e.g. by transcribing g-drops at the end of -ing words as -in’), you’re making a statement: you’re saying “the way I say this word is correct and doesn’t need to be noted; the way other people say it is wrong and changes how the word is spelled”.
When it comes to the differences between, say, Pacific Northwest American English versus Midwest American English, this is definitely annoying to the people whose accent you’re claiming is incorrect. However, this gets even more dicey when you get into cultural and class dialects. This is something you need to handle with even more sensitivity if you’re white, and particularly if you’re both white and upper class, as you’re coming at this from a place of privilege. In this case, the implication becomes that your culture’s dialect of English is the correct one, and other cultural dialects are incorrect.
Because of this, I really, really do not recommend transcribing accents. If they need to be noted at all—which, again, they usually don’t—just note it once, the first time the character speaks, using the same format that you use to notate tone.
8) Music & Sound Effect Description
Finally, the last step in editing your transcript: describing music and sound effects.
Depending on how the script is written, you might not have much to add to sound effects, as they might already be at a point where you’re perfectly happy with the information given. However, you may decide that you want to replace sound effects with action descriptions; e.g. replace “SFX: The sound of clinking keys in a dish” with “She places her keys in the dish”. We’re now back into the realm of “do whatever works for you”—either way works. Just make sure that all of the sounds that the listening audience can hear are transcribed for the reading audience to pick up.
However, it’s very likely that you don’t have descriptions for music baked into the script, particularly if you already knew the titles of the songs you were going to use as the script was written. Generally, I highly recommend adding a short description of what each song sounds like the first time it plays. How necessary this is depends on what kind of music we’re discussing:
- For your theme song and (if you have it) music that plays under the credits, adding a description isn’t completely necessary, but I do recommend it in the interest of giving reading audiences the same experience as listening audiences. After all, you picked your theme music for a reason, right? You chose to start with theme music and not just launch straight into the dialogue because you felt that starting with music adds something to the experience. Don’t reading audiences deserve to get that experience, too?
- For backing music, I recommend descriptions even more strongly. Again, you picked this music for a reason: it adds something to the scene. By giving a description of the music, you’re ensuring that reading audiences get the full effect of the scene
Writing music descriptions seems intimidating, but they don’t have to be long—in fact, in the interest of not slowing down readers too much, they should probably be fairly short. Focus on the most important thing: what emotions is the music supposed to make the audience feel? You can write things like “Sad, mournful music plays quietly under the dialogue”, “Upbeat, happy music begins to play”, or “Fast, tense, angry music plays under combat”. Any description that tells reading audiences what the music is supposed to make them feel is good!
Final Tips
And, with that, you have officially turned your script into a transcript! Now you just need to upload it to your website, and you’re good to go. Just like that, you’ve made your podcast accessible to a much wider audience. Before you go, I have a few final tips for you:
- If more than one person will be editing transcripts, I strongly recommend creating a style guide. This can be short—for most productions, a page or two will likely be fine. Even if you’re the only one who ever edits transcripts, you might still consider creating a style guide for your own reference, as it gives you an easy way to check your styles as you edit without having to stop, pull up old transcripts, and search through those
- At some point, you may find that you have to make a choice between following your style guide exactly or breaking it to try to describe something more accurately. In those instances, I generally recommend letting yourself break the style guide. When creating transcripts, the most important thing is giving reading audiences the same experience as listeners (or as close as possible). If you have to switch things up a little to make that work, so be it
- Consider mentioning transcripts in the audio of your show—especially if you start having transcripts after you’ve already released some episodes of your show. This can be anywhere that works for your show in particular. You can mention it at the start of your show, during a mid-roll ad break, in the credits, or anywhere else that works for you!
- Despite your best efforts, it’s possible that you may one day get contacted by somebody who needs transcripts and wants to tell you that something you’re doing isn’t working—that your transcripts aren’t accessible the way they should be. When this happens, listen and be willing to adjust. If you’re not somebody who relies on transcripts, it can be hard to tell exactly what works and what doesn’t. Listen to the people who do rely on them.
At the end of the day, I know that this is a lot of work to go through. But remember: every time you post a transcript for your show, you’re opening the world up for people who need transcripts. People who have trouble hearing or understanding speech are constantly shut out of experiences in every aspect of our lives, from not being able to watch that new video all of our friends are watching to being excluded at gatherings of friends and family because nobody is taking the time to speak in a way we can understand. The world can start to feel pretty closed off. But when you publish a transcript, you’re opening the world up for us, just a little. And that’s a wonderful, wonderful thing.


Comments
Comments are closed.