


The Best Equipment for a Podcast for 2023 (on any budget)
Last updated on July 16th, 2024
As audio grows in popularity, more and more companies have begun producing equipment for a podcast that is affordable. From established, reputable audio brands marketing products directly to podcasters to new companies popping up with products at varying quality levels, finding the right podcast equipment can be an overwhelming experience.
A “podcasting kit” necessary to produce a show can be as simple as a microphone that records to a laptop, or a several thousand dollar package. Every producer will have different intentions, and there is not a one size fits all answer to what equipment to purchase first.
Furthermore, just because something is more expensive or more advanced does not mean it is the right option for you. Consider building a set of equipment up by adding new pieces to make your process easier with time, rather than buying everything immediately and cutting corners in quality.
Table of Contents
Best Podcast Equipment Guide
This guide will break down the best podcast equipment 2022 & 2023 has to offer at varying price points, but ultimately you should make a decision based on what your podcasting objectives are. For many, podcasting will just be a hobby but if you want to produce a show that eventually brings on advertisers and lures in big guests, a solid gear set-up is essential.
In most cases, the best option will not be the cheapest and listeners of new shows will be deterred by audio that is not crisp. Whether you are starting a show from scratch and need a full set of gear, or you are looking to fill in holes with the podcast equipment you have, these are our picks for the essential equipment at any price point.
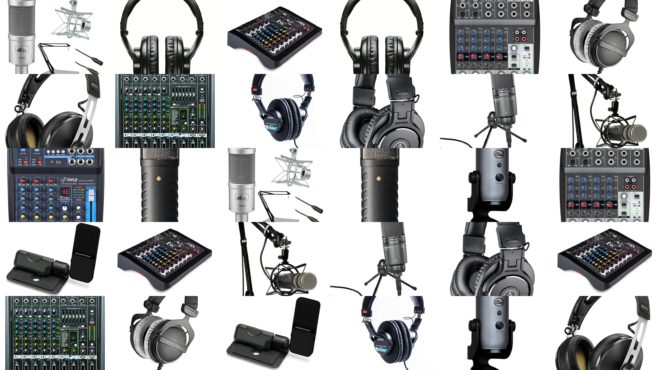
Equipment for a podcast: Podcast Microphones
If there is one piece of equipment that is absolutely essential for podcasting, it is a good quality podcast microphone. Choosing the right studio microphone can make or break your podcast. The past few years have seen the emergence of several new microphones to the market that are sold as “pro-sumer” podcasting mics.
These mics are simple to set up and use, often not requiring a mixer or even an XLR cable, and tend to produce quality audio that will be more than sufficient for most spoken word shows. Musicians or performers looking to create podcasts where perfect audio is essential will still want to opt for traditional, professional mics.
Microphone Differences
One of the key differences in podcasting microphones is the input, specifically XLR and USB. While most readers will be familiar with USB inputs, XLR microphones may be a bit less familiar and with that, tend to come with more professional mics. With all microphones, but especially USB microphones, purchasers should be aware of quality and read reviews or try to find online audio tests.
A second difference you will encounter when researching microphones is the direction from which the microphone records audio, either dynamic or omnidirectional.
A dynamic microphone, or condenser, microphones have a more narrow path and omnidirectional, or cardioid, microphones take in audio from a wider field. While the latter can result in more background noise, it also leads to a fuller, richer sound.
Consider what environments you will be recording audio in and choose accordingly. You don’t want to accidentally ending up sounding like the Hindenburg journalist.
Rode Podmic ($)

The Rode Podmic, priced currently at $99.00, is a steal for the quality and performance. A cardioid mic built for the studio, this option includes an internal pop filter (more on that later) and an internal shock mount that reduces vibration. Although a stand is not included, the mic easily will mount on to whatever set up you would like to use. The all-metal construction also feels expensive and is built to last.
Rode is an incredibly reputable brand in the audio space, and they have a full suite of tools that this mic is designed to work alongside.
If you want a high quality microphone but are intimidated by the idea of purchasing an option that uses an XLR cable, consider something like the Podmic that is specifically designed with the newer podcaster in mind. The Rode NT-USB-Mini USB Mic is another option from Rode, also priced at $99.00, for those looking for a USB set up.
Blue Yeti X USB Mic ($$)

Blue has improved upon their incredibly popular microphone with the Blue Yeti X, marketed specifically to gamers, streamers, and podcasters.
Easily the two most impressive features of the microphone are the ability to switch between four pickup patterns (such as omnidirectional for a group discussion or bidirectional for a two person interview) and the new LED metering system for live evaluation of audio levels.
While neither feature would be especially suitable for a professional audio engineer, they are nice features to have that will certainly help podcasters out.
Every Yeti mic uses USB output and work with their suite of software tools and add-on podcast equipment. The mic comes with a tabletop stand, but can also work with a boom arm or boom stand if preferred. Always easy to use and more than competent in sound, Blue has truly done it again with the Yeti X.
Shure MV7 USB Mic ($$$)

Shure is a household name in audio circles. The Shure SM-57 and 58 are staples in live settings.
Shure has created a microphone that many will see as the best of both worlds. An all-metal mic with a built in headphone jack for live monitoring, the MV7 is one of the best mics on the market that offers both USB and XLR output. With either option, the sound is rich and natural.
Shure has also introduced the ShurePlus MOTIV app for desktop, which allows for additional modifications for how audio is recorded including an Auto Level mode that makes this one of the easiest mics on the market to use.
With it’s dual inputs, Shure’s MV7 is perhaps the best USB microphone on the market. It is a great option for podcasters on the go who may need to use different set ups at different times, and a great option if you are an early stage podcaster looking for a mic that will grow with them.
Movo UM700 Desktop USB Microphone ($)

If you are tired of digging through pages and pages of new brands introducing affordable audio gear, look no further than Movo. Of all of the newer companies that have popped up, Movo is consistently one of the best reviewed and has several well-priced mics (as well as a full catalogue of video and vlogging tools).
Movo has replicated a lot of the features mics by brands such as Blue offer, but at a lower price point. Of course, there are some set-backs, such as the fact that you get a micro-USB input, rather than the USB-C that most higher-end USB mics offer.
When purchasing a lower priced mic, you will miss out on some of the features integrated into other mics such as built-in shock absorption mounts or filters to stop plosions, and may need to fill in those gaps with additional accessories. Still, if you are looking for a solid option under the $100.00 price point, the MovoUM700 is a good bet. Plus, you can skip the extra mic stand.
Podcast Equipment: Microphone Accessories
While not essential, several add-ons will turn a good recording set-up into a great one. Pop filters and shock mounts are definitely worth considering, especially if you are recording audio with speakers who may be a bit more boisterous or are newer to recording audio.
Also known as windscreens, serve to protect a microphone from unwanted peaking caused by certain sounds, typically “P” sounds. These mounts do exactly what the name suggests, and serve as a bit of extra security in case a microphone, or even the table a microphone stand is on, gets bumped. Consider adding these accessories to your set up for a bit of extra protection while recording.
Nady MPF-6 6-Inch Clamp On Microphone Filter ($$)

Few things differentiate the best of the best, but Nady’s MPF-6 is a great option given its long, flexible gooseneck that can be easily attached to most microphones or stands.
The gooseneck and the filter itself are well constructed, and the clamp provides a snug fit. The last thing you want is a pop filter falling off a stand or sliding down mid-recording. At six inches in diameter, it is also provides great coverage compared to some smaller pop filters.
Yeti X Mic Pop Filter ($)

Yeti’s contribution to the market is specifically designed to work with their mics, but will fit with many others as well. It’s constructed with three layers, two steel mesh with sponge in the middle, and has a gooseneck arm with 360 degree flexibility.
Because it is designed to work with Yeti’s mics which often feature tabletop stands, this is a great option for any mic that has a similar design. The clamp is designed to work as an attachment to booms, as well.
There are several great shock-mounts, boom arms and other accessories on the market that are designed specifically for different microphones. In addition, serval manufacturers offer packages with their microphones that include filters or shock-mounts, as well as things such as cables or headphones.
For all accessories, especially if you already own a microphone that you are comfortable using, consider looking into offerings from the same manufacturer to ensure compatibility.
Podcast Equipment: Mixers and Interfaces
If you have a laptop, a podcast mixing board, or audio interface, may not be essential for recording. However, there are a few situations where a mixer is not only recommended, but essential.
As the name indicates, an audio interface is used to combine several different audio elements together and mix them into a single track. The different inputs typically include several different microphone feeds, such as if you are recording a podcast with multiple speakers.
While some capabilities of a mixer can be done with software in post-production, they are a great addition to any kit. If you are using a XLR microphone, you will also need a mixer to record to a laptop, or a separate usb audio interface that accepts XLR cables.
You may also want to add a mixer to your set up if you are recording live shows, or if you simply want more control over your audio. While there may be a bit of a learning curve, the flexibility the interface will provide you with will certainly make it worthwhile.
As you consider this section, note that you will likely come across the term “interface” in your research as well. While there are some differences between the two, such as mixers adding the ability to integrate sound effects, the two essentially serve the same function for podcast recording.
Rode RODECaster Pro ($$$)

No list of mixers for podcasting would be complete without the RODECaster. One of the first mixers marketed specifically for podcasting, the RODECaster changed the game by creating a piece of podcast equipment that was easy to use for people not trained as audio engineers, but equipped with many of the features an engineer would need.
The RODECaster has four input channels for XLR mics, as well as a USB-C input. Additional features such as the ability to connect to a phone via Bluetooth to record interviews were added specifically with podcasters in mind.
The RODECaster is a “prosumer” tool, meaning that while it suitable for professionals, it is designed to be accessible and easy to learn. Keep in mind that with Rode’s offering, you will not be able to control audio input as fully as you would with other similarly priced mixers. In most cases, the mixer is more than enough and the removed functionalities will actually add to ease of use, rather than being a setback.
Yamaha MG10XU ($$)

If you are looking for a more traditional mixer at an affordable price, Yamaha has several great options including the 10-input (four microphone) MG10XU. The mixer includes a USB port to record directly to a computer, and will be similar in design and functionality for those experienced with traditional mixing boards. In addition to this four microphone set up, Yamaha has a full suite or mixers with capabilities for up to 20 inputs.
One benefit of using some of the newer podcasting mixers is that they have multiple headphone outputs for live monitoring, while most traditional mixers would require a splitter. If you are an audiophile though, this Yamaha option will be a great addition to your setup.
Zoom PodTrak P4 Podcast Recorder ($$)

For years, podcasters in the field have been using Zoom devices to record audio. While all of Zoom’s recorders could work well as a podcast interface, the PodTrak P4 was designed specifically for podcasting with a simplified interface, the addition of programmable sound pads, and USB input for remote interviews. There are also four headphone jacks, while Zoom’s products typically just have one.
The benefit of using a tool like the PodTrak P4 is that it is incredibly compact and can be used on the go. Audio is recorded directly to an SD card, so this is a great option for a travel podcasting kit or, as mentioned, field interviews. Zoom’s products are always very intuitive to use, and the addition of a bright screen that allows you to monitor your audio levels, memory card space and battery level is a nice plus.
Focusrite Scarlett ($)

With the Scarlett, Focusrite has created nearly the perfect podcast starter kit interface for a solo podcaster. It turns any bedroom into a podcast studio. Assuming you’ve got the rest of the recording equipment.
For about $100 you get a USB interface with an XLR input, 48v phantom power, and a quarter inch line in. With individual gain and balanced monitoring, you can really dial in the acoustic treatment you’re looking for in your podcast episode.
Focusrite has also put together some equipment packages that may appeal to content creators who are just starting out. They include an audio recorder, headphones, a basic condenser mic and the cables you need. Then all you are shopping for are mic stands that fit your space. Not a bad route.
Essential Podcast Equipment: Headphones
While it may be painful to admit, many of your listeners will likely listen to your episodes through cheap earbuds, car speakers, or other less than ideal output devices. However, when you are monitoring your recording or finetuning your production, quality headphones are essential to ensure that those who do take listening seriously get the quality they deserve.
Anyone who has shopped for podcast headphones knows that prices vary a lot, and in most cases you get what you pay for. While a microphone is a more important investment to make for quality recording, headphones make podcasting fun. You should be able to listen to your audio recordings at the highest level of quality possible.
If you are a new podcaster, rather than setting out to buy headphones just for recording, considering getting a pair you will enjoy listening to audio with as well.
OneOdio Wired Over Ear Headphones Studio Monitor & Mixing DJ Stereo Headsets ($)

OneOdio offers a very affordable pair of headphones that provide clear, dynamic sound comparable with pairs at much higher price points. While they are relatively bulky, they offer a comfortable fit and can be folded and fit into a provided carrying case.
These headphones do not offer wireless functionality or noise cancellation, but remember that in most cases, you will not be able to monitor sound from a mixer or microphone using wireless headphones. Noise cancellation, or a headphone amplifier, while an excellent addition, may not be essential for editing because you will ideally be doing this type of work in a quiet space.
If you are simply looking for an extra pair of headphones to use for editing, or if you want to purchase multiple headphones for guests to use in a studio, OneOdio is a great option.
Sennheiser Pro Audio HD280PRO Headphone ($$)

A household name in audio, Sennheiser makes several great headphones and continues to release new models with improved fit, functionality and design. Compared to previous models, the HD280PRO is largely only different because of changes to the fit and structure.
Sennheiser uses the same audio technology in this pair as previous models, but that sound has been perfected and you will immediately notice the rich, warm sound that Sennheiser headphones provide.
Sennheiser’s headphones are affordable in price, but they also allow you to replace the earpads, headband padding or audio cord, making it a great long-term investment as well.
Audio-Technica ATH-M70X Pro Studio Monitor Headphones ($$$)

Audio-Technica’s headphones are praised by audio engineers and are commonplace in many professional studios. The audio quality provided by Audio-Technica is second to none, with the ability to accurately reproduce extreme low and high frequencies.
This pair is well built, with a comfortable headband and swiveling earcups that allow for one-ear monitoring as well as easy storage. While they are not noise canceling, the ear cup design offers great sound isolation in louder environments.
The Audio Technica headphones also come with three detachable cables, ranging from about four feet to 12 feet, which make them suitable for several editing or monitoring set-ups.
Podcast Equipment: Recording and Editing Software
Audacity (free)
Audacity is an excellent tool for recording and basic editing, incredibly popular with amateurs and professionals alike. Audacity is free to download and despite a very outdated interface, remains a good option for both recording and editing.
Because has been available for so long (the first version was released in 2000), there are plenty of tools and resources available online to help learn the fairly simple interface.
Adobe Audition ($$)
If you are an Adobe suite subscriber, you already have access to capable program. Slightly more affordable than Pro Tools and far more advanced than Audacity, definitely consider Audition if you are looking for an easy-to-learn, robust tool.
While Audition is the obvious reason to purchase the Adobe suite as a podcaster, additional software such as Premiere (for video podcast editing) and Illustrator (for design and illustration) could also be helpful. As a new podcaster with a tight budget, learning these tools will help save you money down the line compared to hiring a freelancer.
Pro Tools ($$$)
If Photoshop is the household name in photo editing, then Pro Tools is the equivalent for audio editing. Pro Tools is used by the world’s leading musicians, engineers, and editors to fine tune audio, and it is more than sufficient for any podcaster. In fact, for many, it may be too much. It’s the digital audio equivalent of a Lambo.
While the basic functionality of Pro Tools can be picked up fairly quickly, but the additional benefits have a very steep learning curve. If you are recording audio clearly in a quiet, softened space, you will ideally not need to be doing a lot of post-production and will not have use for many of Pro Tools’ functions.
For professionals mastering music or scoring movies like the ability to have 256 audio tracks will likely also not be utilized by a podcaster.
Pro Tools has an extensive library of training content, which is a plus, but in most cases it is not an essential piece of a podcasters toolkit. Instead, invest in a good mic, sound blankets or another method of dampening for your recording space, and you will likely be satisfied with a lower cost editing tool.
Logic Pro ($$)
Logic is Apple’s foray into the world of audio editing. While it might be associated with music, it works with all audio interfaces and feels right at home in the podcast production world. Considering Apple invented the entire genre, it if you’re working in the Apple environment, then Logic is a sensible choice for a professional podcast setup.
Garage Band, Apple’s free recording software is, recording software wise, the best podcast equipment for beginners. The learning curve is shallow, its free with every Mac, and you can step up to Logic in your podcasting equipment progression. Apple has created a superb digital recorder ecosystem.
Podcast Hosting Platforms
After you have recorded an episode, you need somewhere to put it online. These platforms handle this aspect of the process, as well as the distribution of episodes to places like Apple Podcasts. Certain hosts also offer a long list of other benefits, so while it can be appealing to look for a free option, this is really not a place to pennypinch.
Some of the most popular options are, Buzzsprout, Libsyn, Altiu, Red Circle, Castos, and Blubrry, but you will find numerous others available as well. We have a list of the best free podcast hosting services, which not only explains features and storage options, but also evaluates the ups and downs of each. For example, many of the top hosting sites will allow you to create a free website for your podcast, while others have proprietary recording or editing software that comes included with a storage subscription.
What essential equipment for a podcast do I spend money on?
In theory, the only equipment for a podcast you require is access to a smartphone or laptop computer. One of the most beautiful things about podcasting is that, compared to other mediums such as video, the barrier to entry is fairly low. That being said, we think that the benefits of spending a bit on certain podcast equipment will be instantly apparent.
If you want to spend less than $150.00
The most important thing in podcasting is your idea or concept, and the second most important thing is your microphone. There are several excellent microphones available for under $100.00, such as Blue or Movo’s offerings. Combining these microphones with Audacity, Garageband or a different free software to record and edit could be a great set-up.
If you are purchasing a lower end microphone, ensure that your recording location is going to produce excellent sound. You can use blankets from around the house to dampen sound, or even record in a closet where the clothes can act as makeshift sound blankets.
If you want to spend $150.00 to $350.00
In this price range, you will have the budget to acquire a paid hosting plan, which will likely be around $100.00 to $150.00 / year depending on the exact service. From there, you can find many excellent microphones in the $100.00 range, and should have budget left over for a few accessories such as a filter for the microphone, or a nice pair of headphones.
If you want to spend more than $350.00
There are several directions you can go if you have a larger podcast equipment budget. For a solo-podcaster, invest in a nice microphone like the Shure MV7, as well as the hosting service of your choice. With a nicer mic, some of the other equipment for a podcast becomes less essential.
You could also easily build out a two or three microphone set up for a podcast with multiple hosts for less than $500.00. A Zoom PodTrak P4, hosting, and two Rode PodMic microphones would put you right at $500.00. Consider also looking for packages that include accessories such as headphones or cables, or consider refurbished podcast equipment if you are purchasing multiple pieces.
Like with most technology, you truly do get what you pay for with audio equipment, and in most cases cheap equipment will need to be replaced, or will be come unusable after a certain amount of time. With equipment you will be using for every episode, such as your microphone or even the cables that go with it, you will end up paying for a slightly cheaper product in the long run.
Above all else though, good equipment cannot save a bad podcast. While a microphone can cost $50.00, $200.00, or even $1,000.00, a good idea for a podcast is priceless.

Previous Story
Radio at the End of the World
)